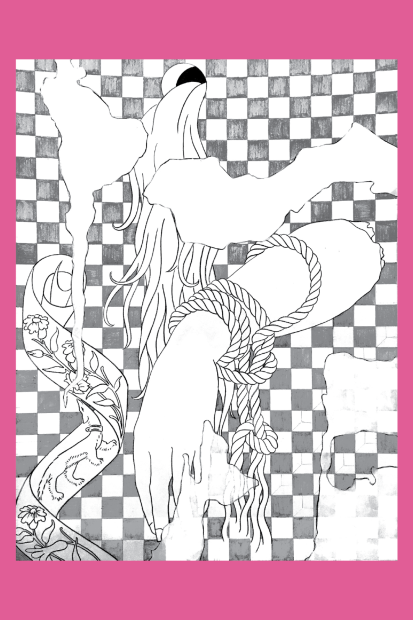
Artwork by Mithsuca Berry
Artwork by Mithsuca Berry
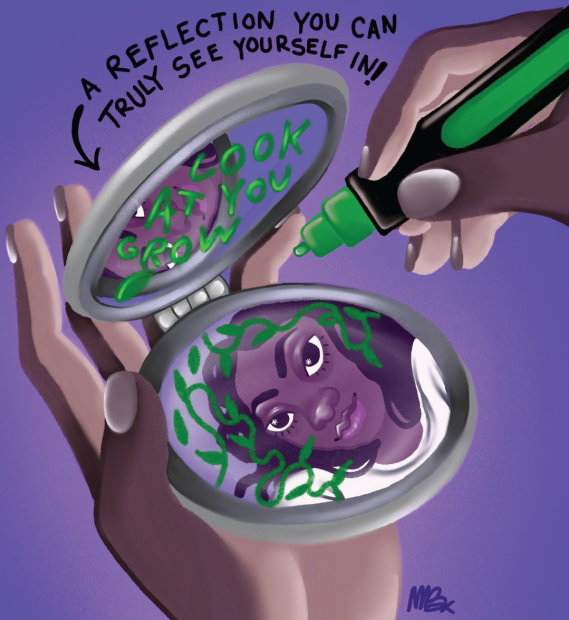
The associations around reflection or looking at oneself can be quite overwhelming. This activity seeks to transform that experience by decorating and thus altering the experience of looking into a mirror. Together we will reimagine what it means to really “see” yourself!
Las asociaciones que podemos tener con nuestra imagen pueden ser bastante abrumadoras. El objetivo de esta actividad es transformar esa experiencia al decorar y, en consecuencia, alterar la experiencia de mirarse al espejo. Juntos volveremos a imaginar lo que realmente significa “mirarse” a uno mismo.
Materials/Materiales:
Instructions:
Write your name on the outside or inside of the mirror.
Think about things that reflect you. Using the paint makers and/or stickers, draw and embellish your ideas on the mirror (I suggest inside for a little surprise when you open it.) Think abstract portrait!
Extra Challenge: Write your thoughts after the experience in a letter to yourself. Keep that letter folded within your mirror for later reading.
Instrucciones:
Desafío adicional: Escribe una carta para ti mismo con tus pensamientos después de la experiencia. Guarda esa carta doblada en el espejo para leerla más tarde.
To Mithsuca Berry, creativity goes beyond technicality and into a way of living. Based in Boston, Mithsuca uses the art of storytelling to bring healing and reimagining to their community.
Para Mithsuca Berry, la creatividad va más allá de lo técnico y es una forma de vivir. Con residencia en Boston, Mithsuca recurre al arte de la narración para aportar sanación y para volver a imaginar la imagen en su comunidad.
The Aztecs used a variety of wind and percussion instruments to make music, including rattles and different kinds of drums. For the Aztecs, dance and songs were ways of praying and meditating to be in harmony with nature, earth, and the universe. In their dances they represented the elements (Wind, Fire, Water, and Soil) and performed to the four cardinal points (North, South, West, and East) to request from Mother Earth the permission to live and work.
The symbol “Nahui Ollin” (pro — nounced as naw-wee-oh-leen) represents the day of the Aztec calendar associated with Xolotl. Xolotl is the god of shifting shapes, twins, and Venus, the Evening Star. Nahui means four, and Ollin means movement.
There are beautiful songs and poetry in Nahuatl, the language of the Aztec people and their descen — dants. Create your own Ayacachtli, or Aztec rattle, and play and sing along to “Huey Tonantiz,” which means Great Mother Earth.
_____________________________________________________________________
Los aztecas usaban una variedad de instrumentos de viento y de percusión para crear música, como sonajeros y diferentes tipos de tambores. Para los aztecas, la danza y las canciones eran maneras de rezar y meditar para estar en armonía con la naturaleza, la tierra y el univer — so. En sus danzas, representaban los elementos (aire, fuego, agua y tierra) y bailaban en dirección a los cuatro puntos cardinales (Norte, Sur, Este y Oeste) para pedirle per — miso a la Madre Tierra para vivir y trabajar.
El símbolo de “Nahui Ollin” (se pronuncia na-hui-o-lin) representa el día de Xolotl en el calendario azteca. Xolotl es el dios de las formas cambiantes, los mellizos y Venus, la estrella de la tarde. Nahui significa cuatro, y Ollin significa movimiento.
En el idioma de los aztecas y sus descendientes, el nahuatl, existen bellas canciones y poemas. Crea tu propio ayacachtli, o sonajero azteca, para tocar y cantar “Huey Tonantiz,” que significa la Gran Madre Tierra.
Materials / Materiales:
Instructions / Instrucciones:
|
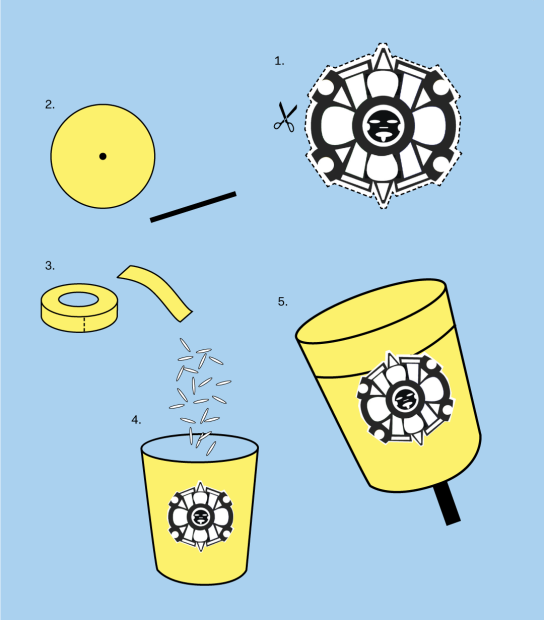
1. Decorate your cup. Color and cut out the image of the “Nahui Ollin” symbol. Glue it on to your cup. Add your own drawings and symbols. Be as creative as you like! 2. Very carefully (and with adult supervision), create a small hole in the bottom of the cup and insert the stick into the cup to attach it. 3. Use the masking tape to wrap the stick and secure it to the cup. 4. Fill your cup with rice. 5. Close the cup with the lid and seal it with masking tape. Note: The sound will be louder with rice. It will sound different if you use beans. You can also try plastic beads or other similar mate — rials. Explore the sounds and beats of nature and try to imitate them with your Ayacachtli.
|
1. Decora el vaso. Colorea y recorta la ima — gen del símbolo de “Nahui Ollin”. Pégalo al vaso. Agrega tus propios dibujos y símbolos. ¡Sé todo lo creativo que quieras! 2. Con mucho cuidado (y con la supervisión de una persona adulta), crea un pequeño orificio en el vaso e inserta el palillo en él para unirlo. 3. Forra el palillo con la cinta adhesiva y sujétalo al vaso. 4. Llena el vaso con arroz. 5. Cierra el vaso con la tapa y séllalo con cinta adhesiva. Nota: El sonido será más fuerte si usas arroz. Sonará diferente si empleas frijoles. Tam — bién puedes probar con cuentas de plástico y otros materiales parecidos. Investiga los sonidos y los ritmos de la naturaleza e intenta imitarlos con tu ayacachtli. |
|
IN ENGLISH “GREAT MOTHER EARTH” Great Mother Earth Translated by Veronica Robles
|
“HUEY TONANTZIN” ¡Huey Tonantzin, Tonantzin, ¡Huey Tonantzin, Tonantzin, Ipalnemohuani Noyolo Paqui Ipalnemohuani Noyolo Paqui EN ESPAÑOL “GRANDIOSA MADRE TIERRA” Grandiosa Madre Tierra, Traducido por Veronica Robles |
This activity was developed by Veronica Robles, a Mariachi singer, musician, and folkloric dancer. Robles has become a cultural icon for Latinos in Boston. She has effectively utilized the power of arts and culture to bring the community together by raising awareness on the importance of diversity. She offers in-person and virtual educational programs for K-12 students in schools and cultural organizations.
Veronica Robles es una cantante, música y bailarina folklórica mariachi que se ha convertido en un referente cultural para los latinos de Boston. Ha recurrido de manera eficaz al poder del arte y la cultura para reunir a la comunidad al crear conciencia sobre la importancia de la diversidad. Ofrece programas presenciales y virtuales para estudiantes de primaria y secundaria en escuelas y organizaciones culturales.

This activity is adaptable for beginners to experts, ideally ages 5 and up. Younger artists may need help making tape loops. Great for individuals, groups, and families to work on together at home.
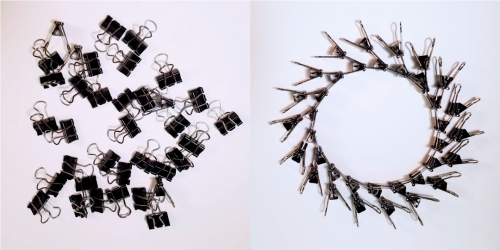
Inspired by Tara Donovan’s sculpture Nebulous made with Scotch tape, we invite you to play with everyday materials which are often found at home and not typically thought of as art supplies. By sticking, stacking, clipping, and positioning mundane objects in new ways, we can transform objects into exciting and unexpected sculptures. Experiment with building temporary sculptures using loops of tape, binder clips, or whatever else you have access to and have permission to use for artmaking. Be creative and share with the world what you make!
You will need:
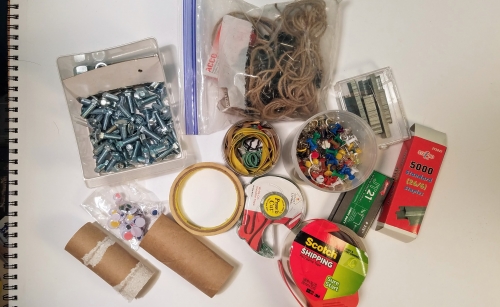
Everyday objects in multiples. Some ideas:
Check out the video demo for tips and a cat cameo!
Check out the video demo for tips and a cat cameo!
Clip one binder clip onto one silver wing of another binder clip.
This lesson was developed by Brooke Scibelli, Family and Art Lab Programs Coordinator.
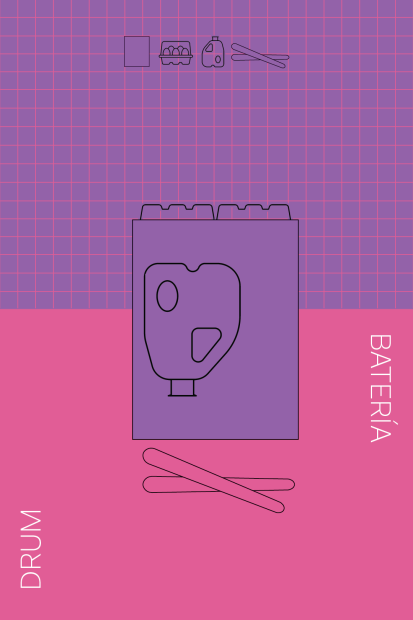
Create your own unique drum to make music!
Using different materials for your drum lets you experiment with different sounds— high, low, short, and long—and make different beats and rhythms. Join musician Maria Finkelmeier in using materials found in your kit to make a drum!
See and hear Finkelmeier play with the drum she made in the following video:
Materials:
How to make a drum:
1. Place a box on your table surface so the open side is towards the floor.
2. Cut or tear off the lid of the empty egg carton. Leave only the bottom half that holds the individual eggs.
3. Tape the bottom half of the egg carton to the side of the box furthest away from you, parallel to the ground. The bottom of the egg carton should be pointed away from you.
4. Tape the milk jug to the top of the box, aligned with the left edge.
5. Decorate your drum with markers and more!
How to be a drummer:
Grab your drumsticks and explore all of the sounds you can make with your drum. Strike the sides of the box, the top of the box, and the milk carton, and then slide your stick along the egg carton.
Explore making beats! A beat is a repeated pattern and supports the melody of a song.
Listen to your favorite music and jam along. Can you use all of the different sounds of your drum? Is the plastic sound higher than the cardboard? Does the egg carton sound like a Guiro (hollow gourd instrument in South America)?
This activity was developed by Maria Finkelmeier. Named a “one-woman dynamo” by The Boston Globe, Finkelmeier is a percussionist, composer, public artist, educator, and arts entrepreneur. Maria has created large-scale multimedia events in public spaces from Cincinnati to Northern Sweden, with several locations in Boston, including Fenway Park and Harvard’s Arnold Arboretum.

Photo by Mel Taing
This activity invites you to explore your home and neighborhood in search of personal peace.
To “fill your cup” is to fill yourself with comfort and safety. How do you fill your cup? What objects can you find that represent this sense of security? Explore the different ways you fill your cup today, and help someone fill theirs in return.
Materials:
1. Use scissors to cut out the city skyline along the dotted line. Include the circle and tabs.
2. Fold tabs and circle at the fold lines.
3. Bring the left and right sides of the city skyline together, creating a cylindrical shape. Dot the tabs with glue and press to close the shape. Fold in the circle to make the bottom of your cup. Dot the tabs with glue to close the bottom of your cup.
4. Explore your home or neighborhood and collect (or draw on paper) the things that make you feel safe, comforted, and peaceful. Fill your cup with these things and place in a special place in your home to visit and reflect on often. Help others fill their cup!
This activity was developed by Mel Taing, an East Boston photographer and filmmaker. As a child of Cambodian refugees in America, Mel is deeply interested in visually exploring concepts of intergenerational trauma, racial identity, spirituality, and resilience in community.
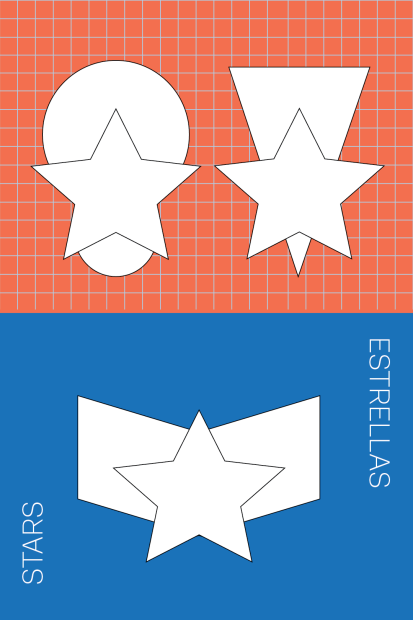
Hope for the future is what keeps us moving forward, but it can take many forms. What does hope look like to you? Fill your stars with hopes to hang in places that need extra light.
Materials:
How to make Hopeful Stars:
This activity was developed by Chanel Thervil, a Haitian American artist and educator. Chanel uses varying combinations of abstraction and portraiture to convene communal dialogue around culture, social issues, and existential questions. At the core of her practice lies a desire to empower and inspire tenderness and healing among communities of color through the arts.
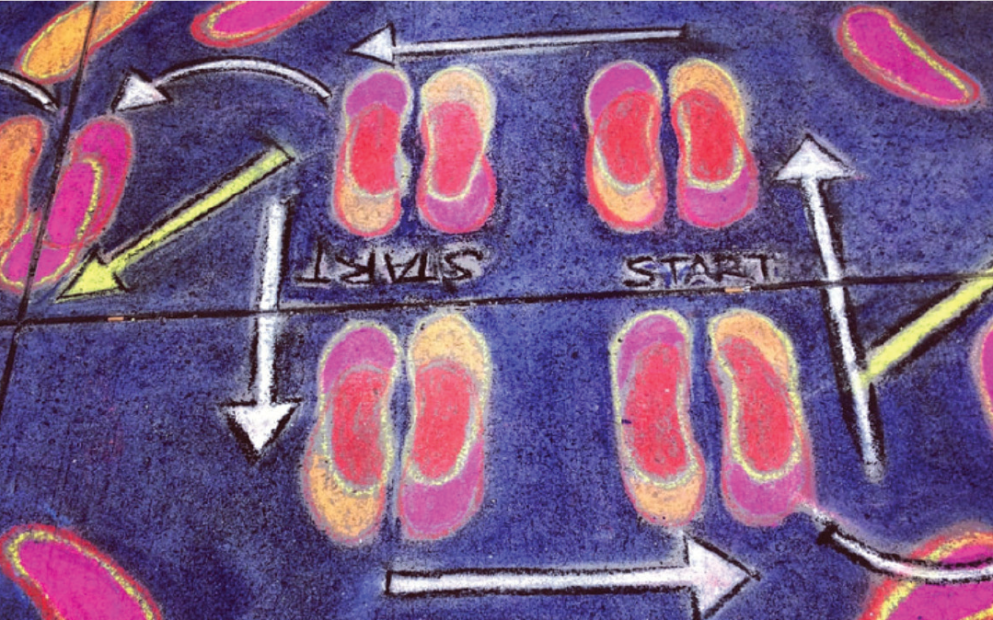
Photo by Elisa Hamilton
Using dance, chalk, and imagination, create your own Dance Spot on your neighborhood sidewalk!
Dance Spot is a public art project by artist Elisa Hamilton, who creates pop-up dance floors on city sidewalks and invites the public to dance.
Materials:
How to make a Dance Spot:
1. Dance: Choose a song that makes you dance, feel the rhythm in your body, and create dance moves. Notice where your feet move and where your body travels.
2. Map: On a piece of paper, draw a map of your dance. Draw footsteps to show where your feet start, and where they move. Use arrows, squiggly lines, and action words like “Jump” and “Clap” to show the moves of your dance.
3. Chalk: Using chalk, draw a life-size copy of your map on the sidewalk. Trace around your shoes to make footsteps (your new stencil!). Make it big and bold for everyone to see! Now you have your Dance Spot!
4. Dance Spot: Play your song and show your moves! Teach your dance to a friend or neighbor, and invite them to use the Dance Spot, too.
This activity was developed by Elisa H. Hamilton, a socially engaged multimedia artist. Elisa creates inclusive artworks that emphasize shared spaces and the hopeful examination of our everyday places, objects, and experiences.
Courtesy of the artist and Bortolami Gallery.
Based on Caitlin Keogh’s painting, Blank Melody, Old Wall, in the ICA’s permanent collection.
You are invited to explore the imagery in this vivid and detailed artwork closely through the act of coloring it in. After completing your new drawing, view Keogh’s finished work here.
Materials:
Painter Caitlin Keogh considers the history of gender and representation, the articulation of personal style, and the construction of artistic identity. With a background in technical illustration and an interest in clothing design, interior decoration, and art history, Keogh’s vivid painterly style combines the graphic lines of hand-drawn commercial illustration with the bold, flat colors of the applied arts—design and decoration of everyday objects.
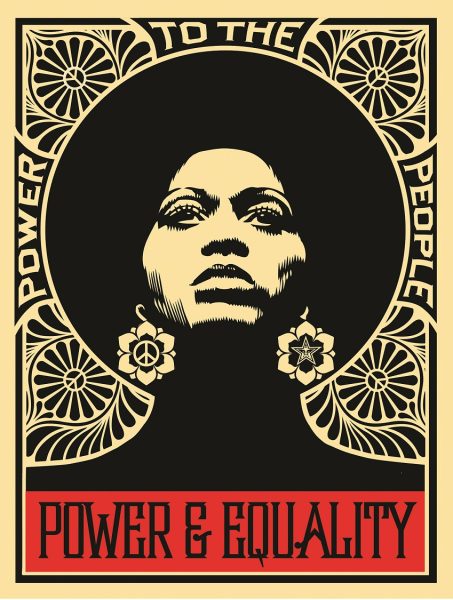
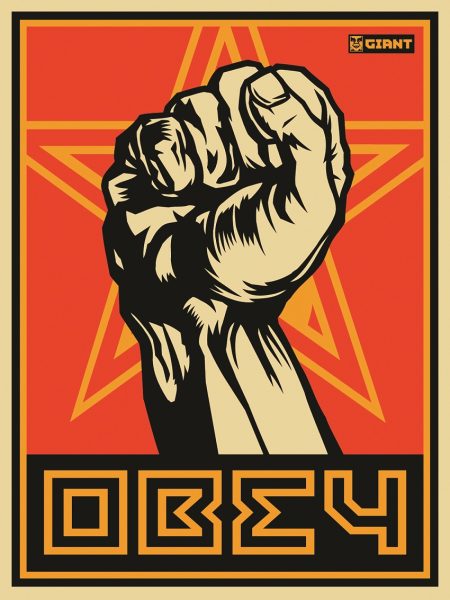
Shepard Fairey, Afrocentric (Power & Equality), 2007. Screenprint, 24 x 18 inches (61 x 45.7 cm). Acquired t…
View full creditsThis activity is adaptable for beginners to experts, ideally ages 8 and up. Please note that this project involves using scissors to cut cardboard and/or paper. Great for individuals, groups, and families to work on together at home.
Inspired by Shepard Fairey’s artwork like Afrocetric (Power and Equality) (2007), create your own stencils with everyday materials found at home. Fairey sometimes uses stencils in his work, particularly in his street art. Once a stencil of an image is made, you can easily reproduce that image many times. By cutting, overlapping, and positioning stencils in new ways, we can create exciting artwork. Experiment with different shapes and patterns. Be creative and share what you make with the world!
You will need:

Optional:
Steps:
1. Draw or trace your shapes and designs on your cardboard. The bigger they are the easier they will be to cut. Think about shapes and designs and how they can be used to communicate ideas.
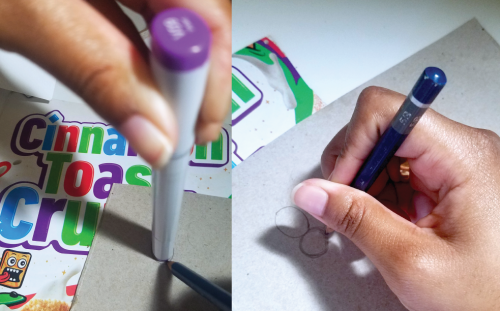
2. Carefully cut out your stencils. You can use both pieces as stencils. Try cutting your stencils in one cut. Move your cardboard as you cut along your shape until you are back where you made the first cut. You can place some tape along your initial cut to keep it intact as you trace.
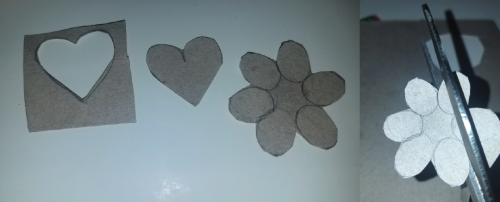
3. Trace your stencils on paper. You can tape down your stencils to keep them from moving while you trace. Try overlapping different shapes and designs.

4. Add color. Out-line and fill in the shapes and designs you traced.

Pro Tip!
You can save and reuse your stencils for future projects!
This activity was developed by Flolynda Jean, Studio Programs Education Assistant.
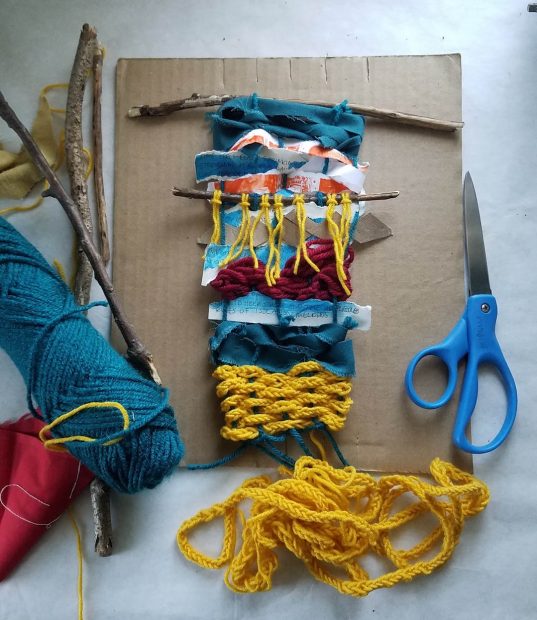
This activity invites kids and their grownups to unite over the meditative and ancient art of weaving. Reflect and create together while weaving your family narrative of life during quarantine.
This activity is appropriate for children ages 5 and up with the help of an adult.
You will need:
1. Writing Reflection Exercise:
2. Make a loom:
Mark 5 equidistant lines from the center of the top and bottom edges of your cardboard. Cut into each line to create equal-sized notches. Now you have a loom to create many weavings with!
3. String your loom:
Tape the end of a long piece of string to one side of the cardboard. Stretch and pull the string into the top, left notch. Stretch down the backside of the cardboard and pull into the bottom left notch. Repeat until the string is pulled snugly into each notch. Tape down end, leaving a 4” tail of string, then cut. Congrats, you’ve strung, or ‘warped’ your loom!

4. Weave!
Weave materials horizontally over and under the vertical strings. Alternate the over/under pattern on the next line. Try to maintain consistent tension while weaving, without pulling too hard. To incorporate your personal story into your weaving, written reflections could be cut or ripped into strips and woven in.
Learn the basics of weaving in these videos:
5. Remove Weaving from Loom:
On the back of the loom, cut the vertical strings across the center. Tie the end of the first string to the second, then second to third, and continue across the top. Repeat by tying your strings across the bottom. Trim ends. Tuck the ends of your weaving into the back. If you’d like, incorporate a stick or dowel and hanging string at the top.
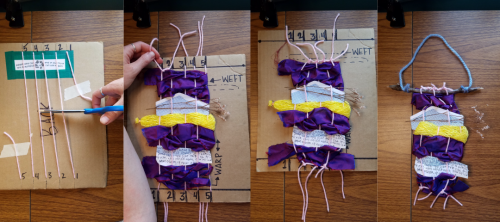
Pro Tip!
You can use your loom to make many more weavings! Add more notches to create a wider weaving. To create different size weavings, change the size of your loom.